
A stats page is useless if you don't know what to do with it. The goal of this guide is simple: review every metric on the site and give you, for each one, the question to ask yourself and the coaching action that follows. Read it in full once, then come back to it after your scrim sessions, tab by tab.
The golden rule of self-coaching: work on only one axis at a time. Spot the lagging statistic, set yourself a concrete objective for the next 5 games, then recheck.
Overview: taking the temperature
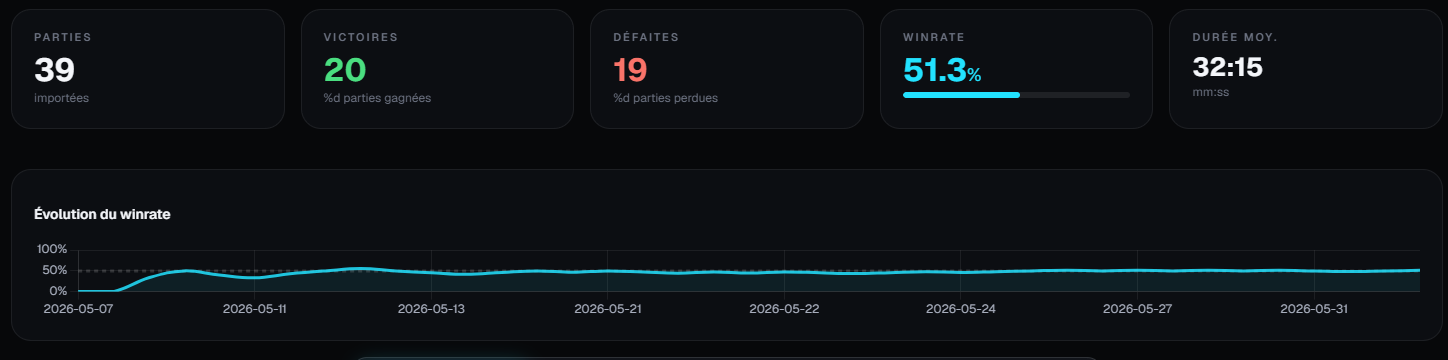
Summary cards (KPIs)
Games, wins, losses, winrate and average duration set the frame. Raw winrate means nothing on its own: it's the trend that matters. The winrate evolution curve tells you whether you're actually improving or stagnating. A curve that sustainably rises above 50% after a comp or draft change proves your work is paying off.
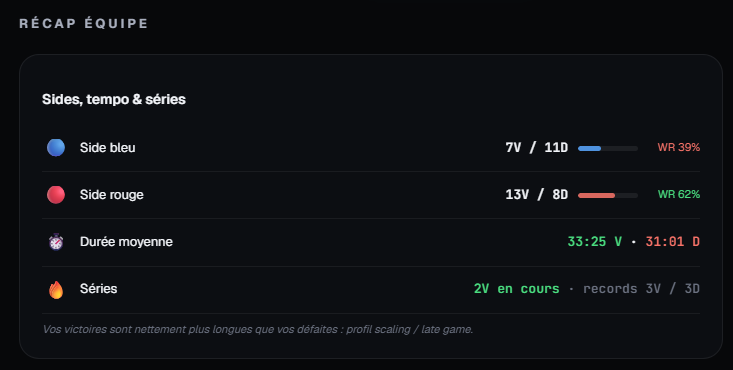
Sides, tempo & streaks
Compare your winrate on blue side and red side. A marked gap (for example 65% blue, 40% red) almost always reveals a draft problem: you're too reliant on blue side picks or you don't know how to handle enemy bans on red. Work on your pick/ban priorities on the weak side.
The average duration of wins compared to losses reveals your profile. If you win short and lose long, you're an early game team: you need to close before the game drags. If it's the opposite, you scale — avoid early fights and play for patience.
Streaks (consecutive wins/losses) measure your mental stability. Long losing streaks often point to a tilt or communication problem between games rather than a mechanical issue.
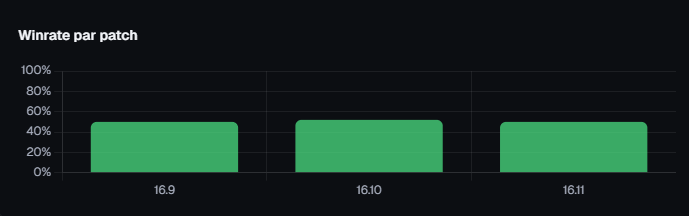
Winrate by patch
Every patch reshuffles the cards. If your winrate drops after an update, your preferred meta was probably nerfed: it's the signal to revise your champion pool and draft, not your mechanics.
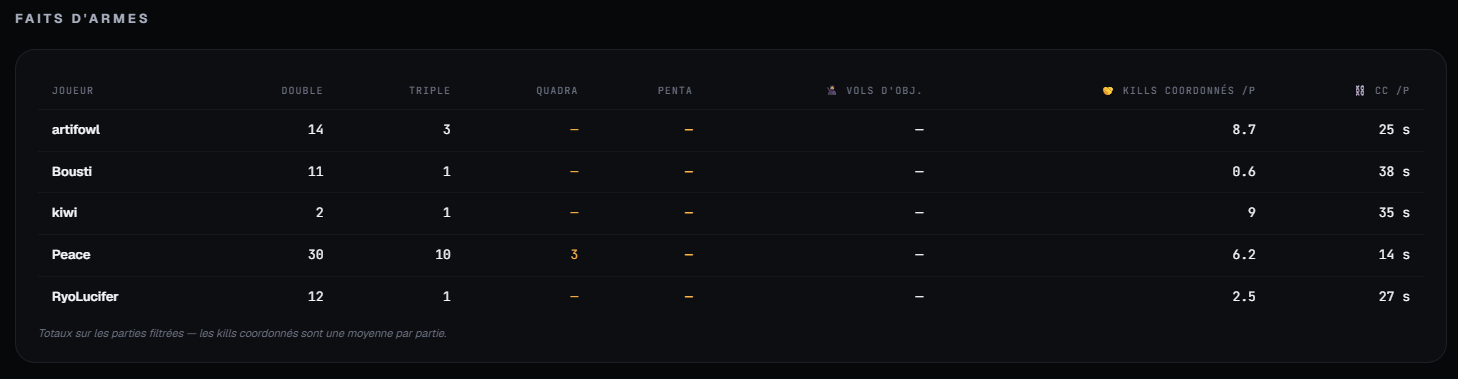
Highlights
This table aggregates coordination signals, not just individual performance:
- Multikills (double to penta): peaks of carry. Useful for identifying your power windows, but don't over-interpret an isolated penta.
- Objective steals: rare, but a good indicator of objective control under pressure.
- Coordinated kills / game: the number of kills created in a pair (target immobilized with an ally, two-man pick). A support or jungler with a low score means a lack of successful engages or vision setup before picks.
- CC / game: the amount of crowd control inflicted. Cross-reference it with coordinated kills: CC applied but few kills means wasted CC due to lack of team follow-up.
By role: who does what
The radars compare your players across three families. Look mainly for abnormal imbalances for a given role, not perfection.
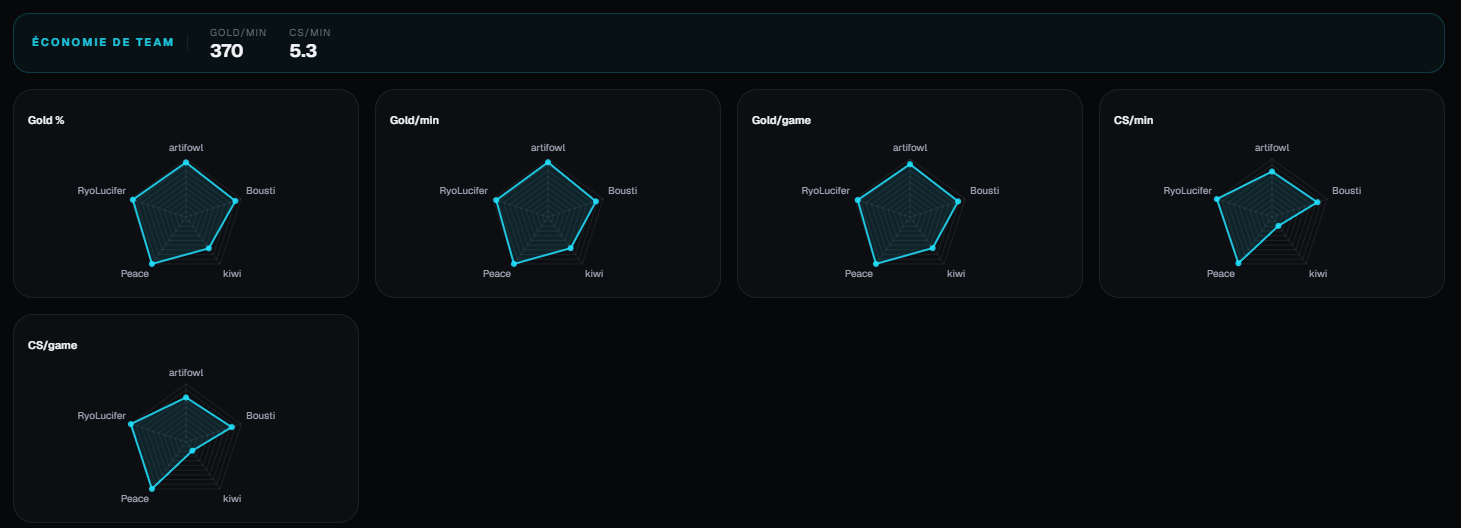
Economy
Gold %, gold/min, gold/game, CS/min, CS/game. A carry (mid, ADC) should dominate gold % and CS/min; if they're at support level, they're not farming enough or dying too much. A toplaner with low CS/min is losing lane or getting ganked repeatedly.
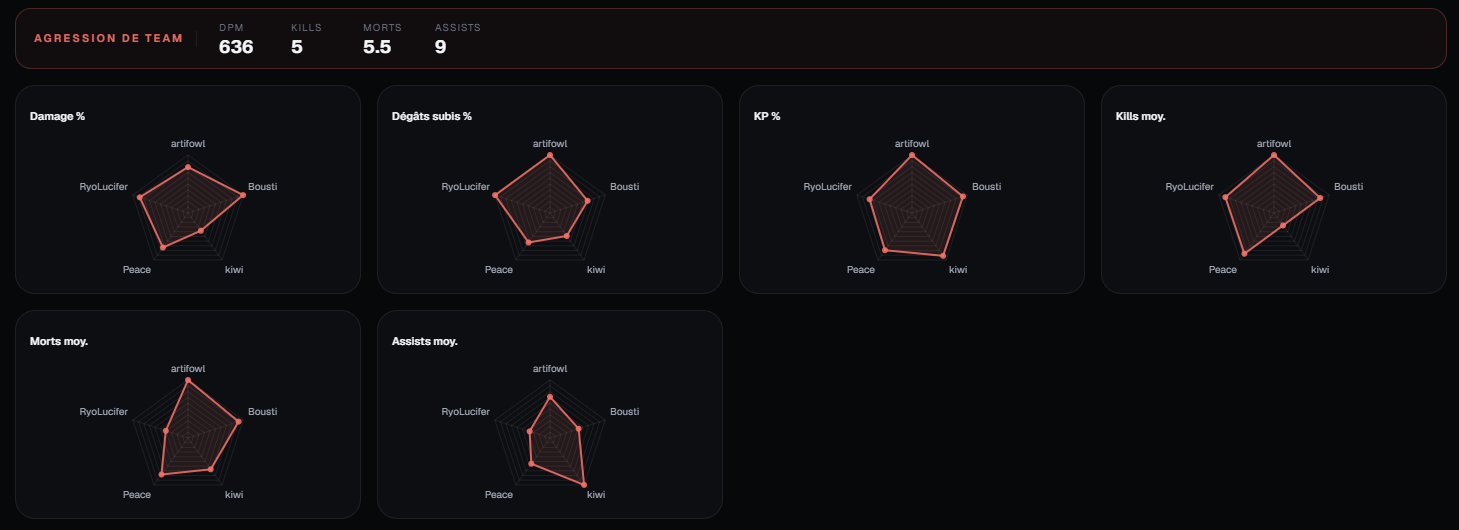
Aggression
Damage %, KP %, average kills/deaths/assists, and damage taken % (the "tank" axis). Cross-reference damage share and gold share: a player who takes a lot of resources but has low damage % is inefficient. Conversely, high "tank %" is expected from an engage toplaner, not an ADC.
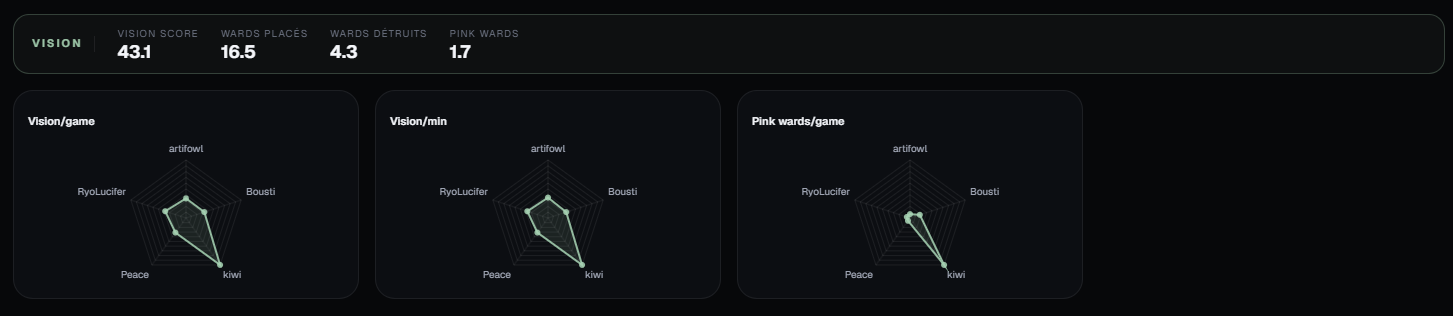
Vision
Vision/game, vision/min, pinks/game. The support should dominate these axes; so should the jungler. If your solos place as much vision as your support, either your support is passive or the whole team is under-investing in pinks.
Objectives: your macro
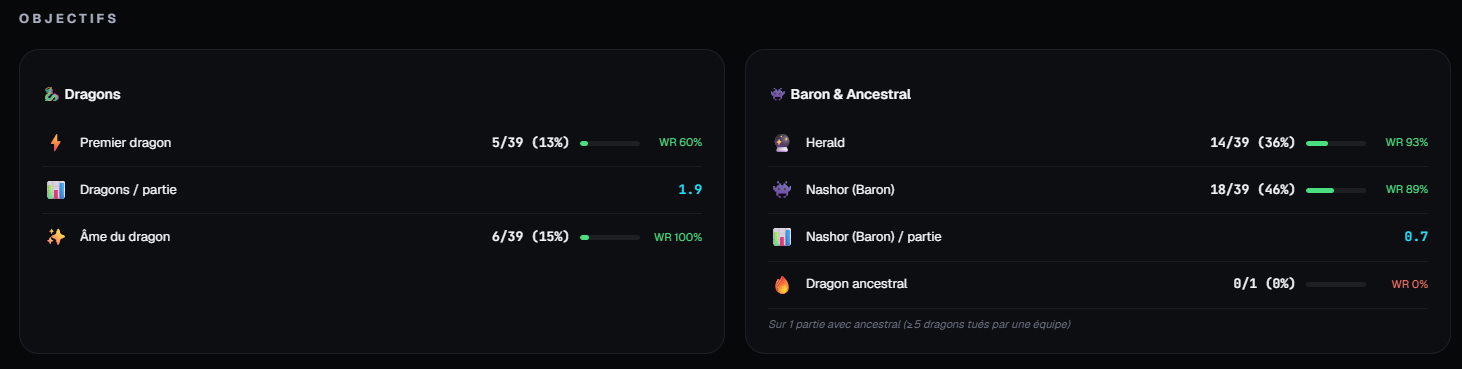
Dragons, Baron, Herald
For each objective, look at both the take rate and the associated winrate. Taking first dragon in 70% of games with a good winrate confirms your early game around drake is working. Taking Baron but still losing signals throws post-Baron: you're forcing fights instead of closing the game.
Firsts...
First blood, first death, first tower. "First death" is underestimated: if you often concede first blood, your laning phase lacks discipline (over-extending, poor matchup respect). First tower measures your ability to convert a lane advantage into a map advantage.

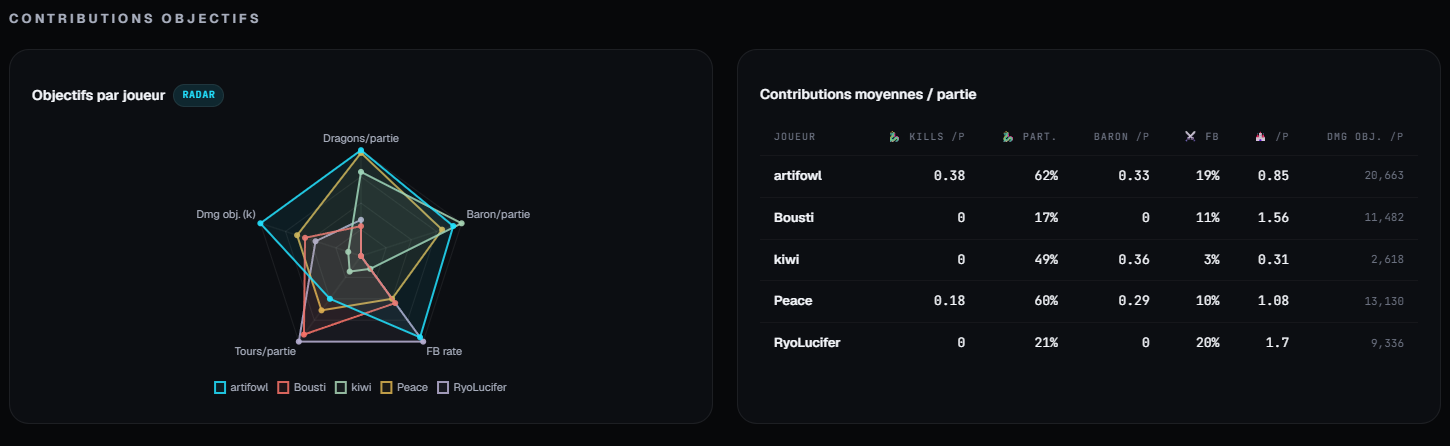
Objective contributions by player
Check that the right people participate in the right objectives: jungler and support on drakes/Herald, not your carries abandoning their wave to tank an objective for no reason.
Early game: the first 15 minutes
Gold diff @10 and @15
This is the thermometer of your collective laning phase. A recurring negative gold diff at 10 minutes means you're losing the map early — often because of jungle pathing uncoordinated with lanes.
Lead conversion @15
Compare your winrate when you're ahead at 15 min and when you're behind. A team that only wins 60% of games where they're leading at 15 min has a real mid game problem: they don't know how to convert a lead. The throw and comeback counters directly quantify this flaw.
Plates and first drake
Your plates compared to the enemy's measure lane pressure. The timing of first drake (you vs them) shows who dictates the tempo of objectives.
Laning phase by player
Gold diff and CS diff @10 against your direct opponent isolate who wins or loses their lane. For the jungler, jungle CS before 10 min reveals pathing efficiency: a low number = time wasted ganking without results instead of farming.
Vision & Map: see before you act
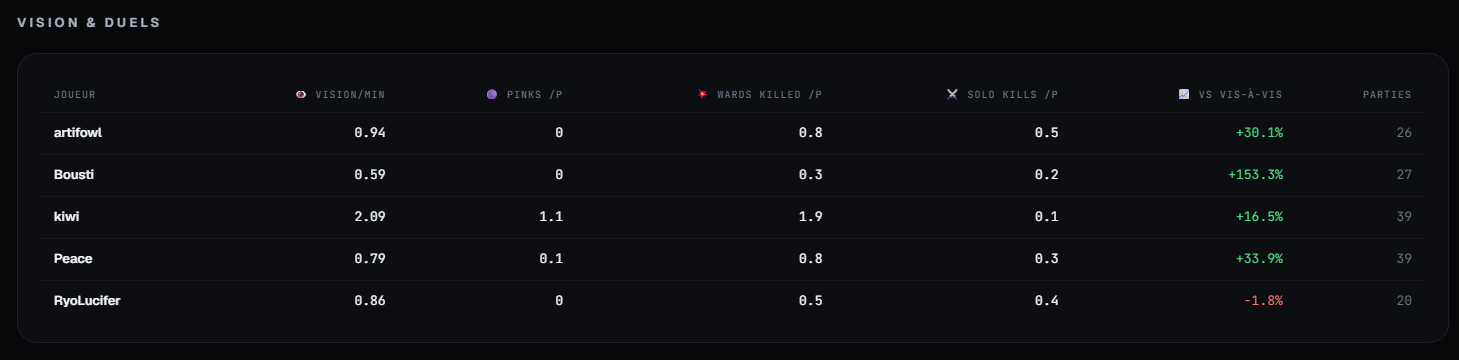
The vision & duels table
Vision/min, pinks, wards destroyed, solo kills and especially vision advantage against your opponent. This figure, plus or minus, tells you whether you're winning the vision war lane by lane.
The kill and death heat map
This is the most telling tool for positioning. Look for recurring clear zones in your deaths: a cluster in river drake-side without vision, repeated deaths in sidelane without tracking the enemy. Filter by time period: deaths 0–15 reveal laning, deaths 25+ betray poor late game positioning.
The rhythm of fights
Kills and deaths per 5-minute slice show when you win or lose your fights. "We lose our fights between 20 and 25 min" jumps out: it's often the window for early unprepared Barons.
Picks & Bans: your draft
Best and worst picks by role, best and worst comps, your "nemeses" (champions that beat you), and your bans. If a champion keeps showing up in your worst matchups game after game and you never ban it, the problem isn't in-game: it's in your ban phase.
The Games page: the missing context
Aggregated numbers hide details. The end-of-game table puts each game in front of you against the enemy, player versus player. When a stat alerts you, open the relevant games and look at the matchup, items and KDA line by line: that's where you'll find the cause, not just the symptom.
Your self-coaching routine
- After each scrim block, open Overview and spot the most glaring anomaly.
- Drop into the relevant tab (early game, vision, objectives…) to isolate the cause.
- Open 2–3 games in Games to confirm with real context.
- Set one measurable objective for your next games.
- Recheck the same stat five games later.
Data doesn't replace work, but it tells you exactly where to put it. Good luck climbing.